
Elevated vacuum sockets are a fabulous innovation. The limb’s weight bearing force is evenly distributed throughout the total surface of the socket, rather than spot specific. For the patient, that translates to a better and more comfortably fitting socket-so long as the socket is sealed and able to maintain vacuum.
Lamination alone does not maintain elevated vacuum. Air leaks through the fibers, causing a loss of vacuum. Consequently, every elevated vacuum socket requires a thin plastic lining to create a barrier.
Thermoforming this thin plastic liner can be a challenge. Experienced technicians chuckle about their first attempts because virtually everyone flops the first time. This task takes speed and finesse, which is a difficult combination, especially for a nervous novice.
At Otto Bock, our chances of thermoforming success are improved with preparation and a proven process.
1. Preparation

A four-inch pylon drilled with two pairs of holes will maintain the vacuum, while
lamination fabric will prevent the plastic from plugging the holes.
Set up close to the oven. For elevated vacuum socket linings, we use 1/8-inch PETG, also known as Vivak® or Durr-Plex. This clear plastic has minimal shrinkage, can be spot-heated with a heat gun, and creates the barrier needed to maintain the elevated vacuum on the finished product. It also cools quickly, so you can’t afford to spend its most cooperative state walking across the shop. Ideally, your pulling station should be within a few steps of the oven.
Attach a pedal to regulate the vacuum. Traditionally, the vacuum on a pulling stand is either on or off, but attaching a regulating foot pedal gives you the ability to feather the vacuum for lighter suction or to turn it off altogether. Then you can stop the vacuum at the first sign of a wrinkle, allowing you to work it out.
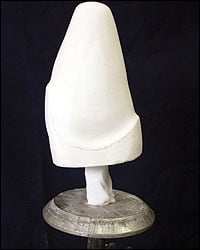
Create an air-flow system. We have found that raising the plaster mold up and off of the pulling platter minimizes wrinkling of the plastic around the trim lines. We use a three- or four-inch piece of scrap pylon, large enough in diameter to slide over the pipe. To keep the plastic from sealing around the pylon, we create a simple venting system. Drill a pair of ¼-inch holes in the side of the pylon about one inch from each end and cut a piece of lamination fabric roughly three times the length of your pylon. String the lamination fabric through the length of the pylon. Open the sock at one end and pull it back over the pylon. Then open the sock at the other end and double-back over the pylon. The holes in the pylon will maintain the vacuum, while the fabric will prevent the plastic from plugging the holes.
2. Process
Prepare the vacuum platter. First, choose the right size-a platter that is closest in diameter to the plaster mold. Our vacuum platters get a lot of use, and it shows. Since knife marks and other dings could allow leaks, we ensure a seal with stretch tape. Go twice around the edge, then flip the roll over and continue another two layers with the adhesive side up. With this self-made, double-faced tape, the plastic clings and seals to the platter, and scars on the platter don’t cause leaks.
Prepare the plaster mold. Slide the fabric-enclosed pylon over the pipe embedded in the plaster mold. Then slide the pipe into the opening in the vacuum platter so the mold rests on the pylon and the pylon rests on the platter.
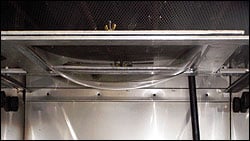
Heat the thermoplastic. Preheat your oven to 350 degrees. Secure a sheet of PETG in a frame. When the oven temperature reaches 350 degrees, slide the frame into the oven.
Choose the right droop. We get the best results by letting the plastic droop about half the height of the plaster mold. Make sure you have a sense of what half of the mold’s height looks like, and remove the plastic from the oven as soon as the droop reaches that measurement.
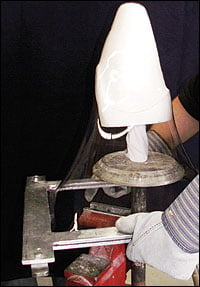
Pull plastic. At this point, I should note that the term “pulling plastic” is very misleading. PETG at melting point offers no resistance, so there is no need to muscle plastic into compliance. In fact, any force you apply will stretch this already-thin plastic. The more it stretches and thins out, the more it tends to collapse and wrinkle.
With your gloves on, grab the frame and go. Flip or invert the frame, using a fluid motion to swoop the droop over the mold. Let gravity do the work, lowering the frame as PETG naturally falls and forms against the mold. As soon as plastic meets platter, drop the frame and use gloved hands to press the plastic firmly against the platter’s beveled edge to complete a seal.
A few notes:
-
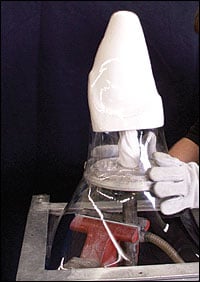
- Irregular shape. It’s all about the shape of the socket. For a straight socket, a straight pull works like magic. With an irregular socket, a straight pull may cause the plastic to stretch in some areas and sag in others. Instead, try to outline the shape of the mold. If the top of the mold is angled, start from that angle, keeping the frame perpendicular to the imaginary line running through the center of the mold. This can be a two-person job: one to pull plastic and one to help the plastic mold to the shape and handle any undercuts-where plastic tends to wrinkle.
-
- Long and big. The longer or the bigger the mold, the more challenging the pull. On these jobs, the plastic is more likely to stretch and become thinner, making it easier for the plastic to wrinkle. It often takes two to pull the PETG on larger molds.
- Temperature. We work with plaster molds at room temperature. PETG cools instantly on a cold mold. For more working time with the plastic, warm the cast.
- Work out the trouble spots. Put your foot on the pedal, and turn on the heat gun.
- Imperfect seal. If the vacuum isn’t working as it should, a wrinkle on the platter may have created a leak. First, heat the area. Then press your gloved thumb on the wrinkle to seal and flatten the wrinkle. There also could be a hole in the PETG that has formed around the pylon. Use a chunk of Duct Seal to fill any holes.
- Wrinkles. Heated plastic adheres to itself, so if two sides of a fold touch, they become a permanent wrinkle. We’ve seen PETG linings with wrinkles that were flattened. The patient may not feel the telltale lines, but we don’t accept those imperfections. If plastic on the plaster wrinkles, we start over. The key to preventing wrinkles is stopping the vacuum the instant you see plastic folding or collapsing on itself. Let the plastic cool and harden a few seconds. Then heat the area around the wrinkle and gently use your gloved hand to work the plastic away from the wrinkle. Finally, heat the wrinkle. Try to separate the edges of the wrinkle, while feathering the vacuum.
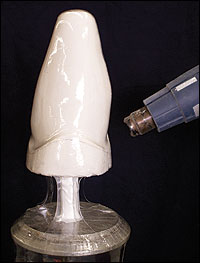
- Air pockets. Gray shadows or lines appear where plastic is not touching the plaster. Take the time to heat those areas with the suction on to make sure that all plastic is flush against the mold.
- Communication. If the job requires two people, both should shout, “Off!” when they spot a wrinkle, and the person running the vacuum-control pedal should declare, “On!” before releasing the pedal.
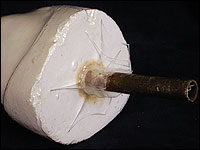
- Seal the plaster mold. Because the mold is raised, excess plastic forms around the pylon. This plastic can be used to seal the cast. Use shears to cut the plastic midway between the platter and the mold. Pull the pylon out, then, using a heat gun and gloved hand, press the raised plastic toward the pipe and flatten it against the mold. This will keep moisture in and resin out. Just in case there’s a pinhole, we cover the flat surface with packing tape to ensure the barrier. Now you’re ready for lamination, with a PETG lining as the inner layer.
Support authors and subscribe to content
This is premium stuff. Subscribe to read the entire article.


